
In the summer, people tend to enjoy eating refreshing foods. Do you like the cool and chewy texture of liangpi? Both medium-gluten and high-gluten flour can be used to make liangpi. Medium-gluten flour contains more starch than high-gluten flour, resulting in a slightly yellowish color, while high-gluten flour has a higher protein content, making it easier to develop gluten and resulting in a whiter and more translucent color. The thickness of the liangpi is determined by the amount of flour batter and the size of the baking pan; if the batter is too thick, the liangpi may crack, while if it is too thin, it may lack chewiness.

“Freshly washed starch from flour has better elasticity and softness than starch from store bought. Starch will harden over time after being steamed, so it’s best to wash and steam it right away for the most chewy and delicious texture. If left in the refrigerator overnight after being made, the starch will lose its elasticity and become brittle, breaking easily.”

“Liangpi, roasted gluten, and wheat starch are three types of food ingredients that are derived from wheat flour, and the process of making them is really interesting. Next time, I will introduce roasted gluten. If you like my sharing, please remember to subscribe, comment, and share. Thank you for your support!”

◤Ingredients
- All Purpose Flour or Bread Flour or Bread Flour 200 g
- Table Salt 1/2 tsp
- Water (for washing the flour) 1200 ml
◤Oil-splashed spicy sauce https://www.beanpanda.com/147080
◤Homemade garlic sauce: https://www.beanpanda.com/145967
◤Vinegar sauce: I directly use the brine from pickled vegetables. The method is here 👉 https://www.beanpanda.com/146143
◤Method
- Mix All Purpose Flour with table salt and stir evenly. Slowly pour in warm water while stirring and gradually incorporate all the flour. Different brands of flour have different water absorption rates, so don’t pour all the water at once. Leave about 1/10 of the water and mix until lumpy. Let the flour absorb the water to avoid a cycle of adding more flour and water.
- The dough won’t stick to your hands when kneading and should form a rough surface. Cover and let it rest for 45 minutes to prevent the surface from drying out. When flour and water are mixed, the starch in flour dissolves in water, but the protein does not. After the dough is kneaded, the ingredients inside the dough begin to repel each other and form a gluten network over time. After resting, knead the dough slightly until it becomes smooth and non-sticky.”

- Roll the dough into a ball and place it in a large dish. If you want to turn the gluten obtained from washing the dough into baked gluten, it’s best to knead the dough until a thin film forms.
- Pour in warm water and start washing the dough. The dough contains a small amount of water-soluble protein and a large amount of starch. Squeeze and wash the dough in the water. The water will gradually become cloudy, and it’s better to squeeze it with your hands. The water will become a dense milky white, and stretching out the gluten will increase its contact with water. Collect the starch water from the washed gluten and filter it through a mesh sieve to prevent flour crumbs from falling.
- Add a small amount of new water each time, and continuously pull and squeeze the dough until the water turns into a soy milk color. Keep adding a small amount of water and squeezing the dough repeatedly. This process may need to be repeated 15-20 times until the washing water becomes thick soy milk.
- By the 10th time of adding water, the gluten will become looser and smaller in volume. Keep kneading it repeatedly, and the starch water will become clearer.
- By the 15th time of adding water, the gluten made mainly of protein will naturally stick together.
- By the 20th time of adding water, the dough will become a lumpy wet gluten, and the starch water will become very thin. At this point, the washing can be stopped, and all the starch water can be collected. I usually pour the starch water into a measuring cup, which is convenient for storing it in the refrigerator overnight. It takes up less space and allows you to observe the precipitation of the starch.

- After letting it sit for 3-4 hours, you will see the starch settling. The settling speed will slow down later. Put it in the refrigerator for 10-12 hours until the starch is completely stabilized. This will make it easier to control the ratio of starch and water.
- During the settling process, do not stir. Use a spoon to scoop up the clearer water on top and leave about 400 ML of starch and 50 ML of water. The starch slurry should have a certain thickness. If it’s too thick, the liangpi will crack, and if it’s too thin, the liangpi will be soft and lack chewiness. It’s okay to add more water, but if the liangpi cracks easily after steaming, you can add more water to the starch slurry. If there’s too much water, the liangpi will be soft and lack texture after steaming, and the starch slurry will need to settle for a longer time.

- Starch is heavier than water. It will settle at the bottom over time. Before steaming, be sure to stir it well. Prepare a stainless steel shallow dish according to the size of your steamer, whether it’s square or round. Spray a thin layer of oil and pour in the starch slurry evenly. Thinly cover the surface of the dish, and only add the boiling water to the dish. Immediately cover it and steam over high heat for 2 minutes. The steamed liangpi will be translucent and have big and small bubbles on it. When the steam dissipates, it will shrink.
- Use a plate lifter to take out the steamed liangpi and place it on cold water. The cooled liangpi can be easily removed, and it will be translucent, soft, and chewy.

- Pour the starch slurry into another dish and steam it in boiling water for 2 minutes.
- The finished liangpi can be stacked together.
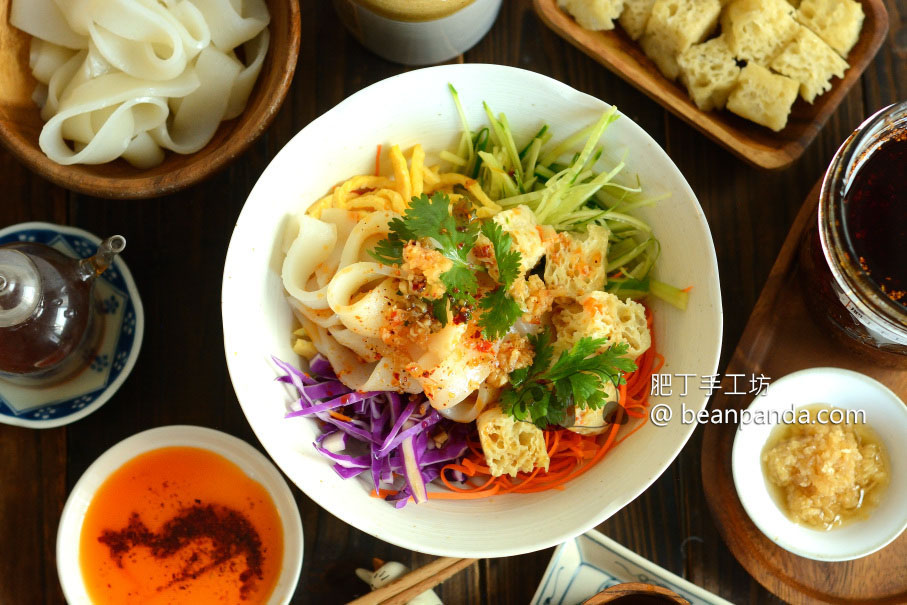
- Mix the liangpi with shredded carrots, cucumbers, eggs, shredded purple cabbage, homemade baked gluten, and cilantro. Season it with homemade garlic sauce, homemade oil-splashed chili, and homemade seasoned vinegar. Mix it well, and the liangpi will be chewy, the gluten will be elastic, the vegetables will be refreshing, the sourness will be refreshing, and the spiciness will be comfortable. It’s delicious!
- The starch slurry can be stored in the refrigerator for 3-4 days. When consuming, steam it until it’s cooked.

【Homemade wheatstarch】
Once completely dehydrated, the final product is called wheatstarch, which has higher viscosity and transparency. It’s commonly used in shrimp dumpling wrappers, Chinese steamed dumplings, and silver needle noodles.
- Pour the starch slurry onto a baking tray in a dryer and dry it at 70°C for 4-6 hours. Crush the dried starch chunks and store them in a ziplock bag at room temperature for 3-6 months. Grind the chunks into powder before use, and it will become cornstarch.
- Mix the cornstarch with twice the amount of water and stir it until it’s completely dissolved into a starch slurry. Steam it until cooked.