臘味煲仔飯【鑄鐡鍋】Hong Kong Style Claypot Rice with Lap Cheong (Cast Iron Pot)
[:hk]https://videos-by.vemba.io/v2/placements/27221.js
[embedyt] http://www.youtube.com/watch?v=TvGsbHOQdCI%5B/embedyt%5D
? 點這裡免費訂閱肥丁 YouTube 頻道 https://goo.gl/rBq3rJ
臘味飯香傳篇整條街明火經典瓦煲的臘味煲仔飯,是你的冬天回憶嗎?肥丁也是臘味煲仔飯的Big Fans,除了捉進經濟外食,也喜歡自己在家做,不過肥丁不太放心瓦煲的內陶瓷釉料,近年用保溫效果良好的鑄鐵鍋,煮好就可以直接美美上桌。如何米飯又熟透又不燒焦鍋底,就要好好煉習熟悉你自己的爐具、火喉、不同米品種的吸水性。除了測量準確水量,適量加點米醋,讓米粒不會糊化,有助煮出Q彈顆顆分明的米飯,醋只要很小的分量,吃飯時不會有醋味唷 ~ 肥丁混入糙米和小米,多菜少肉,吃得更營養 ﹗

小米 Millet ~ 祛濕、健脾、鎮靜、安眠。不會被高度精制加工,能夠保存重要的營養素。在眾穀類中含有最多人體必需而又不能自製的氨基酸,富含維他命、礦物質、蛋白質及不飽和脂肪含量最高。含有礦物質「硅」,有助頭髮、皮膚、牙齒、指甲的健康,缺乏這種礦物質,會導致身體關節組織鬆懈。不含麩質,適合腸胃敏感朋友。
糙米 Brown Rice ~ 日本稱「玄米」。稻米脫殼後就是糙米,保留粗糙的外層 (包括皮層、糊粉層和胚芽),顏色較精製白米深,保存完整稻米營養,富含蛋白質、脂質、纖維及維生素B1等,比白米更健康但味道不如白米,口感較硬,需要更久的烹調時間。

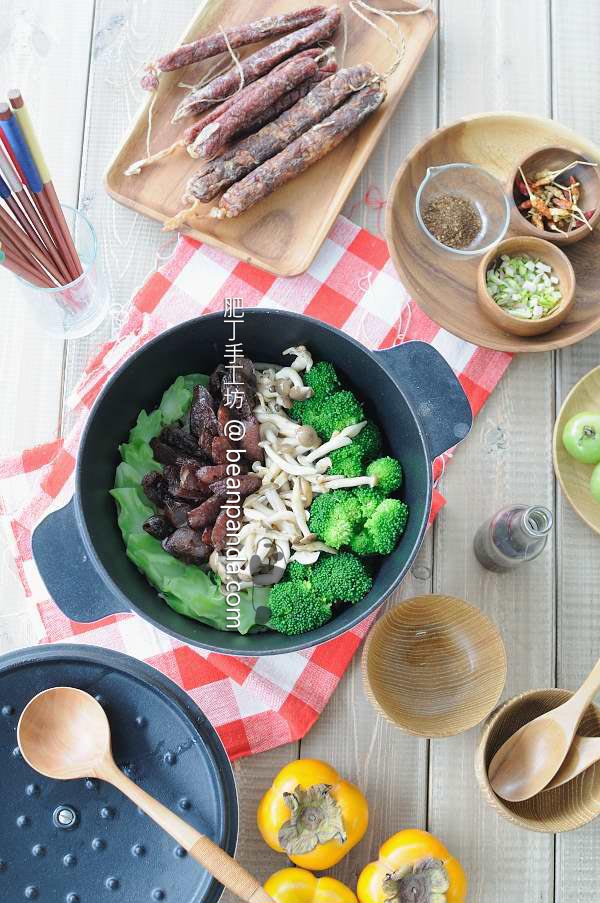
材料 ( 4 人份 )
- 臘腸 Chinese Sausage 4 根 (自製臘腸點這裏)
- 潤腸 Chinese Liver Sausage 2 根
- 鴻喜菇 Buna Shimeji Mushrooms 1 包 ( 100 g )
- 綠花菜(西蘭花)/油菜(菜芯) Broccoli 1 棵
- 薄切薑片 Thinly Sliced Ginger 3 ~ 4 片
- 梗米(珍珠米) Short Grain Rice 250 g
- 有機糙米 Organic Brown Rice 25 g
- 有機小米 Organic Millet 25 g
- 熱水 Hot Water 350 ml
- 米醋 Rice Vinegar 1 小匙
拌飯醬汁
- 醬油 Light Soy Sauce 1 大匙
- 味醂 Mirin 1 大匙
- 熱開水 Hot Water 1 大匙
工具
- 24 cm 鑄鐵鍋
- 電陶爐
做法
1. 臘腸放在流水下滾動一下,洗去表面灰塵和雜質,備用。肥丁用自己做的臘腸,所以不用洗囉 ~

2. 梗米、糙米、小米放入碗中混合,加入清水洗淨,用網篩過濾瀝乾水份
3. 臘腸和潤腸斜切薄片,綠花菜倒轉,沿徑切成一朵朵,莖部斜切成厚片。鴻喜菇切根,薑片去皮薄切

4. 在小鍋中注入滾水,煮至沸騰,放入薑片,先加入慢熟的綠花菜厚片,然後加入綠花菜的花蕾,大火煮 1 分鐘,先撈起綠花菜的花蕾,最後撈起厚片,這樣厚片便有足夠時間煮熟。(肥丁只有一個電爐,所以先灼熟綠花菜,但很快便會變涼。如有兩個電爐,綠花菜可在步驟 6 之後才開始煮熟)

5. 2000 watts (大火) 加熱鑄鐵鍋,放入臘腸和潤腸薄片,利用鍋底的熱力迫出臘腸的油脂,然後改為 800 watts,炒臘腸至外皮微微焦脆,潤腸較易煮焦先夾起來,放入鴻喜菇和臘腸一起炒,鴻喜菇放入後不用攪拌太多,讓菇慢慢吸收臘腸油脂的香氣,如鍋子太熱可加點水。把臘腸和菇來起。

6. 快速加入瀝乾的米,拌炒一下,加入熱水和米醋,攪拌均勻,放入臘腸 (肥丁不喜歡太油膩所以沒放),1200 watts 煮到水開始沸騰,加上鍋蓋,煮 10 分鐘,如用瓦斯,中小火 (爐火不可超過鍋身直徑範圍,但不能用爐心火,否則受熱不均勻)。熄火,悶約 10 ~ 15 分鐘,把熱量保存在鍋內把米飯悶熟,千萬不要開蓋,否則米心難熟,再開火加熱有機會把底部的米飯煮焦


7. 悶飯的時候排好臘腸和放進去的配料,混合拌飯醬汁,稍微煮滾會更好
8. 十分鐘後,打開鑄鐵鍋,把臘腸切片和其他配料放進去,放回爐上,400 watts 加熱 5 ~ 10 分鐘,如喜歡鍋巴(飯焦),可加大火力。如米飯未熟,需要加長加熱的時間

9. 淋上少許拌飯醬汁,即可享用!
小叮嚀
- 電陶爐和電磁爐是不同的,電陶爐沒有磁場,不會干擾電子溫度計,爐面發熱要小心燙手。優點是爐面熱力均勻,電子設定溫度標準容易量度,很適合搭配鑄鐵鍋煮飯,只要測試出適合的溫度,以後很少出現偏差。瓦斯(煤氣)的爐具火力差異相當大,明火煮飯需要耐心測試,累積經驗,認識火力然後調節適應
- 鑄鐵鍋的厚薄也直接影響米飯悶熟的速度,第一次製作一定要自己記錄時間和爐火的溫度
- 米飯是悶熟而非煮熟的,明火加熱的時間不能太長
- 米的份量增加,煮飯的水份要按比例增加,但是煮飯時間只要增加數分鐘就可以
- 如果氣溫低於 10°C,可能要增加悶熟透米飯的時間
[:hk]臘味煲仔飯【鑄鐡鍋】Hong Kong Style Claypot Rice with Lap Cheong (Cast Iron Pot) [:en]Hong Kong Style Claypot Rice with Lap Cheong (Cast Iron Pot)[:]
材料 ( 4 人份 )
- 臘腸 Chinese Sausage 4 根 (自製臘腸點這裏)
- 潤腸 Chinese Liver Sausage 2 根
- 鴻喜菇 Buna Shimeji Mushrooms 1 包 (100 g)
- 綠花菜 (西蘭花/油菜(菜芯) Broccoli 1 棵)
- 薄切薑片 Thinly Sliced Ginger 3 ~ 4 片
- 梗米 (珍珠米 Short Grain Rice 250 g)
- 有機糙米 Organic Brown Rice 25 g
- 有機小米 Organic Millet 25 g
- 熱水 Hot Water 350 ml
- 米醋 Rice Vinegar 1 小匙
拌飯醬汁
- 醬油 Light Soy Sauce 1 大匙
- 味醂 Mirin 1 大匙
- 熱開水 Hot Water 1 大匙
工具
- 24 cm 鑄鐵鍋
- 電陶爐
- 臘腸放在流水下滾動一下,洗去表面灰塵和雜質,備用。肥丁用自己做的臘腸,所以不用洗囉 ~
- 梗米、糙米、小米放入碗中混合,加入清水洗淨,用網篩過濾瀝乾水份
- 臘腸和潤腸斜切薄片,綠花菜倒轉,沿徑切成一朵朵,莖部斜切成厚片。鴻喜菇切根,薑片去皮薄切
- 在小鍋中注入滾水,煮至沸騰,放入薑片,先加入慢熟的綠花菜厚片,然後加入綠花菜的花蕾,大火煮 1 分鐘,先撈起綠花菜的花蕾,最後撈起厚片,這樣厚片便有足夠時間煮熟。(肥丁只有一個電爐,所以先灼熟綠花菜,但很快便會變涼。如有兩個電爐,綠花菜可在步驟 6 之後才開始煮熟)
- 2000 watts (大火) 加熱鑄鐵鍋,放入臘腸和潤腸薄片,利用鍋底的熱力迫出臘腸的油脂,然後改為 800 watts,炒臘腸至外皮微微焦脆,潤腸較易煮焦先夾起來,放入鴻喜菇和臘腸一起炒,鴻喜菇放入後不用攪拌太多,讓菇慢慢吸收臘腸油脂的香氣,如鍋子太熱可加點水。把臘腸和菇來起
- 快速加入瀝乾的米,拌炒一下,加入熱水和米醋,攪拌均勻,放入臘腸 (肥丁不喜歡太油膩所以沒放),1200 watts 煮到水開始沸騰,加上鍋蓋,煮 10 分鐘,如用瓦斯,中小火 (爐火不可超過鍋身直徑範圍,但不能用爐心火,否則受熱不均勻)。熄火,悶約 10 ~ 15 分鐘,把熱量保存在鍋內把米飯悶熟,千萬不要開蓋,否則米心難熟,再開火加熱有機會把底部的米飯煮焦
- 悶飯的時候排好臘腸和放進去的配料,混合拌飯醬汁,稍微煮滾會更好
- 十分鐘後,打開鑄鐵鍋,把臘腸切片和其他配料放進去,放回爐上,400 watts 加熱 5 ~ 10 分鐘,如喜歡鍋巴(飯焦),可加大火力。如米飯未熟,需要加長加熱的時間
- 淋上少許拌飯醬汁,即可享用!
[:en]https://videos-by.vemba.io/v2/placements/27221.js
[embedyt] http://www.youtube.com/watch?v=TvGsbHOQdCI%5B/embedyt%5D
? 點這裡免費訂閱肥丁 YouTube 頻道 https://goo.gl/rBq3rJ
Hong Kong style claypot rice usually cook with charcoal. The rice are cooked and steamed slowly with Chinese Sausage or Pork belly, whip up a quick sauce, and stir it all together with fresh green onion. The salty, savory sausage and pork belly flavor the rice. In this recipe I also used a cast iron pot instead of claypot.
Ingredients ( Serve 4 )
- 4 pcs Chinese Sausage ( Homemade Chinese Sausage Recipe )
- 2 pcs Chinese Liver Sausage
- 1 package of Buna Shimeji Mushrooms ( 100 g )
- 1 Broccoli
- 3 ~ 4 pcs Thinly Sliced Ginger
- 250 g Short Grain Rice
- 25 g Organic Brown Rice 25 g
- 25 g Organic Millet 25 g
- 350 ml Hot Water 350 ml
- 1 tsp Rice Vinegar 1 小匙
Sweet Soy Sauce
- 1 tbsp Light Soy Sauce
- 1 tbsp Mirin
- 1 tbsp Hot Water
Equipment
- 24 cm Cast Iron Pot
- Electric Ceramic Heaters Stove
Instructions
1. Rinse the stored bought Chinese sausage, if you have homemade sausage, it is not necessary to do this step.
2. Rinse and drain short grain rice, brown rice and millet with a sift.
3. Chinese sausage slice thinly on the diagonal. Trim off the broccoli florets, slice straight through the broccoli stem as close to the crown as you can get. The crown should break into several large florets. Cut through the “trunk” of each floret to make bite-sized pieces. Thinly sliced the stem, you can remove the tougher top layer of skin with a peeler if you would like. Cut away the root of Buna Shimeji.
4. Bring a large pot of water to a rapid boil. Add the broccoli stem first, then add the florets and cook until crisp-tender for about 1 minutes. Stems take longer than florets to cook. Remove the florets and then stem with a slotted spoon and plunge immediately.
5. Turn on the electric ceramic heaters stove to the highest heat (2000W) , add the Chinese sausage and fried until the oil comes out. Turn down the heat to 800W. Add buna shimeji mushrooms, stir fried until the mushroom smelt good. You can add some water if the pot is too hot. Transfer the Chinese sausage and mushroom to a plate and set aside.
6. Don’t wash the cast iron pot. Add in your raw rice to the pot (still on medium-high heat) gently stir the raw rice in the fat for 30 seconds until coated. Pour in hot water and snuggle in the pork belly and sausage in the rice. I don’t want the rice to be too oily so I don’t put the sausage in. Add rice vinegar and stir well. Bring to a low boil and immediately cover. Cooked at the medium heat (1200W) for 10 minutes. Then turn off the stove, take away the cast iron pot and keep the lid cover for 10 ~ 15 minutes. Don’t try to open the lid we need keep the temperature to cooked rice.
7. Mix the sweet soy sauce.
8. Open the lid, quickly place all the sausage and vegetables onto the cooked rice. Covered again and put it back to the stove on low heat (400 W) for 5 ~ 10. If you like coke rice, you may cook with higher heat. If the rice still not cooked, you need to cooked the rice for longer time with low heat.
9. Serve with rice and sweet soy sauce drizzled on top.
[:hk]臘味煲仔飯【鑄鐡鍋】Hong Kong Style Claypot Rice with Lap Cheong (Cast Iron Pot) [:en]Hong Kong Style Claypot Rice with Lap Cheong (Cast Iron Pot)[:]
材料 ( 4 人份 )
- 臘腸 Chinese Sausage 4 根 (自製臘腸點這裏)
- 潤腸 Chinese Liver Sausage 2 根
- 鴻喜菇 Buna Shimeji Mushrooms 1 包 (100 g)
- 綠花菜 (西蘭花/油菜(菜芯) Broccoli 1 棵)
- 薄切薑片 Thinly Sliced Ginger 3 ~ 4 片
- 梗米 (珍珠米 Short Grain Rice 250 g)
- 有機糙米 Organic Brown Rice 25 g
- 有機小米 Organic Millet 25 g
- 熱水 Hot Water 350 ml
- 米醋 Rice Vinegar 1 小匙
拌飯醬汁
- 醬油 Light Soy Sauce 1 大匙
- 味醂 Mirin 1 大匙
- 熱開水 Hot Water 1 大匙
工具
- 24 cm 鑄鐵鍋
- 電陶爐
- 臘腸放在流水下滾動一下,洗去表面灰塵和雜質,備用。肥丁用自己做的臘腸,所以不用洗囉 ~
- 梗米、糙米、小米放入碗中混合,加入清水洗淨,用網篩過濾瀝乾水份
- 臘腸和潤腸斜切薄片,綠花菜倒轉,沿徑切成一朵朵,莖部斜切成厚片。鴻喜菇切根,薑片去皮薄切
- 在小鍋中注入滾水,煮至沸騰,放入薑片,先加入慢熟的綠花菜厚片,然後加入綠花菜的花蕾,大火煮 1 分鐘,先撈起綠花菜的花蕾,最後撈起厚片,這樣厚片便有足夠時間煮熟。(肥丁只有一個電爐,所以先灼熟綠花菜,但很快便會變涼。如有兩個電爐,綠花菜可在步驟 6 之後才開始煮熟)
- 2000 watts (大火) 加熱鑄鐵鍋,放入臘腸和潤腸薄片,利用鍋底的熱力迫出臘腸的油脂,然後改為 800 watts,炒臘腸至外皮微微焦脆,潤腸較易煮焦先夾起來,放入鴻喜菇和臘腸一起炒,鴻喜菇放入後不用攪拌太多,讓菇慢慢吸收臘腸油脂的香氣,如鍋子太熱可加點水。把臘腸和菇來起
- 快速加入瀝乾的米,拌炒一下,加入熱水和米醋,攪拌均勻,放入臘腸 (肥丁不喜歡太油膩所以沒放),1200 watts 煮到水開始沸騰,加上鍋蓋,煮 10 分鐘,如用瓦斯,中小火 (爐火不可超過鍋身直徑範圍,但不能用爐心火,否則受熱不均勻)。熄火,悶約 10 ~ 15 分鐘,把熱量保存在鍋內把米飯悶熟,千萬不要開蓋,否則米心難熟,再開火加熱有機會把底部的米飯煮焦
- 悶飯的時候排好臘腸和放進去的配料,混合拌飯醬汁,稍微煮滾會更好
- 十分鐘後,打開鑄鐵鍋,把臘腸切片和其他配料放進去,放回爐上,400 watts 加熱 5 ~ 10 分鐘,如喜歡鍋巴(飯焦),可加大火力。如米飯未熟,需要加長加熱的時間
- 淋上少許拌飯醬汁,即可享用!
[:]


不知道le creuset和康寧鍋有沒有什麼分別呢?兩個用起來很像