Hong Kong Style Claypot Rice with Lap Cheong (Cast Iron Pot)

Hong Kong Style Claypot Rice with Lap Cheong (Cast Iron Pot)

材料 ( 4 人份 )

  • 臘腸 Chinese Sausage 4 根 (自製臘腸點這裏)
  • 潤腸 Chinese Liver Sausage 2 根
  • 鴻喜菇 Buna Shimeji Mushrooms 1 包 (100 g)
  • 綠花菜 (西蘭花/油菜(菜芯) Broccoli 1 棵)
  • 薄切薑片 Thinly Sliced Ginger 3 ~ 4 片
  • 梗米 (珍珠米 Short Grain Rice 250 g)
  • 有機糙米 Organic Brown Rice 25 g
  • 有機小米 Organic Millet 25 g
  • 熱水 Hot Water 350 ml
  • 米醋 Rice Vinegar 1 小匙

拌飯醬汁

  • 醬油 Light Soy Sauce 1 大匙
  • 味醂 Mirin 1 大匙
  • 熱開水 Hot Water 1 大匙

工具

  • 24 cm 鑄鐵鍋
  • 電陶爐
  1. 臘腸放在流水下滾動一下,洗去表面灰塵和雜質,備用。肥丁用自己做的臘腸,所以不用洗囉 ~
  2. 梗米、糙米、小米放入碗中混合,加入清水洗淨,用網篩過濾瀝乾水份
  3. 臘腸和潤腸斜切薄片,綠花菜倒轉,沿徑切成一朵朵,莖部斜切成厚片。鴻喜菇切根,薑片去皮薄切
  4. 在小鍋中注入滾水,煮至沸騰,放入薑片,先加入慢熟的綠花菜厚片,然後加入綠花菜的花蕾,大火煮 1 分鐘,先撈起綠花菜的花蕾,最後撈起厚片,這樣厚片便有足夠時間煮熟。(肥丁只有一個電爐,所以先灼熟綠花菜,但很快便會變涼。如有兩個電爐,綠花菜可在步驟 6 之後才開始煮熟)
  5. 2000 watts (大火) 加熱鑄鐵鍋,放入臘腸和潤腸薄片,利用鍋底的熱力迫出臘腸的油脂,然後改為 800 watts,炒臘腸至外皮微微焦脆,潤腸較易煮焦先夾起來,放入鴻喜菇和臘腸一起炒,鴻喜菇放入後不用攪拌太多,讓菇慢慢吸收臘腸油脂的香氣,如鍋子太熱可加點水。把臘腸和菇來起
  6. 快速加入瀝乾的米,拌炒一下,加入熱水和米醋,攪拌均勻,放入臘腸 (肥丁不喜歡太油膩所以沒放),1200 watts 煮到水開始沸騰,加上鍋蓋,煮 10 分鐘,如用瓦斯,中小火 (爐火不可超過鍋身直徑範圍,但不能用爐心火,否則受熱不均勻)。熄火,悶約 10 ~ 15 分鐘,把熱量保存在鍋內把米飯悶熟,千萬不要開蓋,否則米心難熟,再開火加熱有機會把底部的米飯煮焦
  7. 悶飯的時候排好臘腸和放進去的配料,混合拌飯醬汁,稍微煮滾會更好
  8. 十分鐘後,打開鑄鐵鍋,把臘腸切片和其他配料放進去,放回爐上,400 watts 加熱 5 ~ 10 分鐘,如喜歡鍋巴(飯焦),可加大火力。如米飯未熟,需要加長加熱的時間
  9. 淋上少許拌飯醬汁,即可享用!

鑄鐡鍋臘腸煲仔飯 Cast Iron Pot Rice Lap Cheong Recipe

? 點這裡免費訂閱肥丁 YouTube 頻道 https://goo.gl/rBq3rJ

Hong Kong style claypot rice usually cook with charcoal. The rice are cooked and steamed slowly with Chinese Sausage or Pork belly, whip up a quick sauce, and stir it all together with fresh green onion. The salty, savory sausage and pork belly flavor the rice. In this recipe I also used a cast iron pot instead of claypot.

rice_w_lap_chang_01

Ingredients ( Serve 4 )

  • 4 pcs Chinese Sausage ( Homemade Chinese Sausage Recipe )
  • 2 pcs Chinese Liver Sausage
  • 1 package of Buna Shimeji Mushrooms ( 100 g )
  • 1 Broccoli
  • 3 ~ 4 pcs Thinly Sliced Ginger
  • 250 g Short Grain Rice
  • 25 g Organic Brown Rice 25 g
  • 25 g Organic Millet  25 g
  • 350 ml Hot Water 350 ml 
  • 1 tsp Rice Vinegar  1 小匙

Sweet Soy Sauce

  • 1 tbsp Light Soy Sauce
  • 1 tbsp Mirin
  • 1 tbsp Hot Water

Equipment

  • 24 cm Cast Iron Pot
  • Electric Ceramic Heaters Stove

rice_w_lap_chang_ing

Instructions

1. Rinse the stored bought Chinese sausage, if you have homemade sausage, it is not necessary to do this step.

rice_w_lap_chang_step_01

2. Rinse and drain short grain rice, brown rice and millet with a sift.

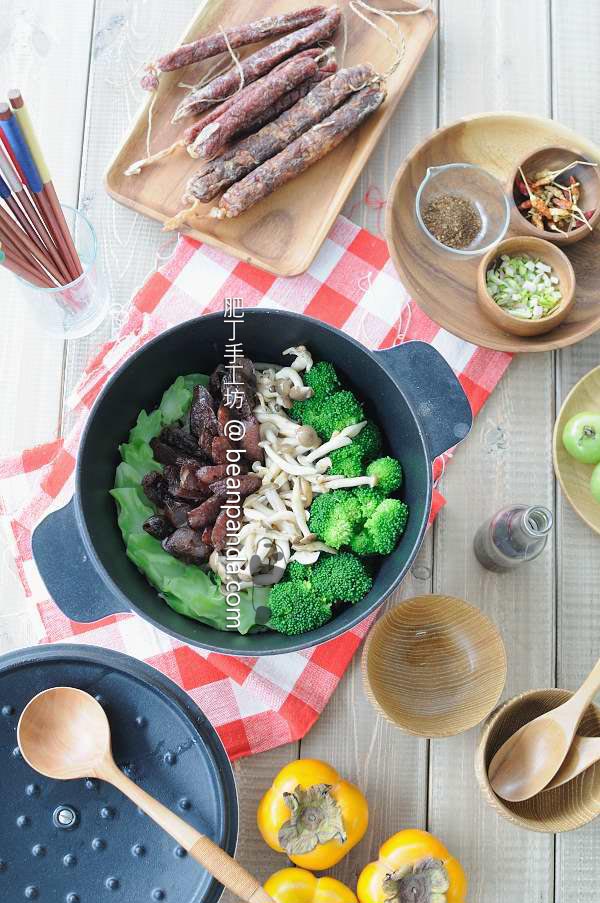
3. Chinese sausage slice thinly on the diagonal. Trim off the broccoli florets, slice straight through the broccoli stem as close to the crown as you can get. The crown should break into several large florets. Cut through the “trunk” of each floret to make bite-sized pieces. Thinly sliced the stem, you can remove the tougher top layer of skin with a peeler if you would like. Cut away the root of Buna Shimeji.

rice_w_lap_chang_step_02

4. Bring a large pot of water to a rapid boil. Add the broccoli stem first, then add the florets and cook until crisp-tender for about 1 minutes. Stems take longer than florets to cook.  Remove the florets and then stem with a slotted spoon and plunge immediately.

rice_w_lap_chang_step_03

5.  Turn on the electric ceramic heaters stove to the highest heat (2000W) , add the Chinese sausage and fried until the oil comes out.  Turn down the heat to 800W. Add buna shimeji mushrooms, stir fried until the mushroom smelt good. You can add some water if the pot is too hot.  Transfer the Chinese sausage and mushroom to a plate and set aside.

rice_w_lap_chang_step_04

6. Don’t wash the cast iron  pot.  Add in your raw rice to the pot (still on medium-high heat) gently stir the raw rice in the fat for 30 seconds until coated. Pour in hot water and snuggle in the pork belly and sausage in the rice. I don’t want the rice to be too oily so I don’t put the sausage in. Add rice vinegar and stir well. Bring to a low boil and immediately cover. Cooked at the medium heat (1200W) for 10 minutes. Then turn off the stove, take away the cast iron pot and keep the lid cover for 10 ~ 15 minutes. Don’t try to open the lid we need keep the temperature to cooked rice.

rice_w_lap_chang_step_05rice_w_lap_chang_step_06

7. Mix the sweet soy sauce.

8. Open the lid, quickly place all the sausage and vegetables onto the cooked rice. Covered again and put it back to the stove on low heat (400 W) for 5 ~ 10. If you like coke rice, you may cook with higher heat. If the rice still not cooked, you need to cooked the rice for longer time with low heat.

rice_w_lap_chang_step_07

9. Serve with rice and sweet soy sauce drizzled on top.

Hong Kong Style Claypot Rice with Lap Cheong (Cast Iron Pot)

材料 ( 4 人份 )

  • 臘腸 Chinese Sausage 4 根 (自製臘腸點這裏)
  • 潤腸 Chinese Liver Sausage 2 根
  • 鴻喜菇 Buna Shimeji Mushrooms 1 包 (100 g)
  • 綠花菜 (西蘭花/油菜(菜芯) Broccoli 1 棵)
  • 薄切薑片 Thinly Sliced Ginger 3 ~ 4 片
  • 梗米 (珍珠米 Short Grain Rice 250 g)
  • 有機糙米 Organic Brown Rice 25 g
  • 有機小米 Organic Millet 25 g
  • 熱水 Hot Water 350 ml
  • 米醋 Rice Vinegar 1 小匙

拌飯醬汁

  • 醬油 Light Soy Sauce 1 大匙
  • 味醂 Mirin 1 大匙
  • 熱開水 Hot Water 1 大匙

工具

  • 24 cm 鑄鐵鍋
  • 電陶爐
  1. 臘腸放在流水下滾動一下,洗去表面灰塵和雜質,備用。肥丁用自己做的臘腸,所以不用洗囉 ~
  2. 梗米、糙米、小米放入碗中混合,加入清水洗淨,用網篩過濾瀝乾水份
  3. 臘腸和潤腸斜切薄片,綠花菜倒轉,沿徑切成一朵朵,莖部斜切成厚片。鴻喜菇切根,薑片去皮薄切
  4. 在小鍋中注入滾水,煮至沸騰,放入薑片,先加入慢熟的綠花菜厚片,然後加入綠花菜的花蕾,大火煮 1 分鐘,先撈起綠花菜的花蕾,最後撈起厚片,這樣厚片便有足夠時間煮熟。(肥丁只有一個電爐,所以先灼熟綠花菜,但很快便會變涼。如有兩個電爐,綠花菜可在步驟 6 之後才開始煮熟)
  5. 2000 watts (大火) 加熱鑄鐵鍋,放入臘腸和潤腸薄片,利用鍋底的熱力迫出臘腸的油脂,然後改為 800 watts,炒臘腸至外皮微微焦脆,潤腸較易煮焦先夾起來,放入鴻喜菇和臘腸一起炒,鴻喜菇放入後不用攪拌太多,讓菇慢慢吸收臘腸油脂的香氣,如鍋子太熱可加點水。把臘腸和菇來起
  6. 快速加入瀝乾的米,拌炒一下,加入熱水和米醋,攪拌均勻,放入臘腸 (肥丁不喜歡太油膩所以沒放),1200 watts 煮到水開始沸騰,加上鍋蓋,煮 10 分鐘,如用瓦斯,中小火 (爐火不可超過鍋身直徑範圍,但不能用爐心火,否則受熱不均勻)。熄火,悶約 10 ~ 15 分鐘,把熱量保存在鍋內把米飯悶熟,千萬不要開蓋,否則米心難熟,再開火加熱有機會把底部的米飯煮焦
  7. 悶飯的時候排好臘腸和放進去的配料,混合拌飯醬汁,稍微煮滾會更好
  8. 十分鐘後,打開鑄鐵鍋,把臘腸切片和其他配料放進去,放回爐上,400 watts 加熱 5 ~ 10 分鐘,如喜歡鍋巴(飯焦),可加大火力。如米飯未熟,需要加長加熱的時間
  9. 淋上少許拌飯醬汁,即可享用!

One thought on “Hong Kong Style Claypot Rice with Lap Cheong (Cast Iron Pot)

和肥丁說說話 Leave a Reply

This site uses Akismet to reduce spam. Learn how your comment data is processed.

error: Content is protected !!