
In my previous video, I shared a little trick for making Liangpi (a type of cold noodle). Don’t waste the leftover gluten from making Liangpi – you can use it to make baked gluten! I made two versions of baked gluten: one where I washed the gluten and another where I didn’t. Then, I compared their textures. Finally, I also shared a recipe for sweet and sour gluten.

I think the homemade roasted gluten without washing has a better texture than the store-bought one. There is a type of flour called wheat gluten flour or vital wheat gluten available in the market. It is a plant-based protein extracted from wheat flour and has a not-so-pleasant smell. I usually add nutritional yeast, a type of vegetarian food with a nutty and cheesy flavor, to enhance the taste.

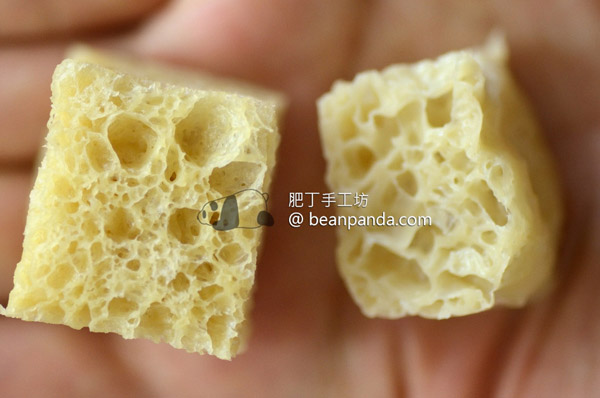
The two methods of making roasted gluten result in significantly different textures. You can choose the method according to your preference. The one on the left is made with wheat gluten flour, while the one on the right is made by washing high-gluten flour. I prefer the latter as it has a more tender and smooth texture, while the former has a chewier and firmer texture.

When it comes to dishes made with roasted gluten, many people know the classic cold appetizer, “Four Delicacies Roasted Gluten.” This time, let’s try a sweet and sour flavor with sugar and vinegar roasted gluten. Adding vegetables such as bell peppers, red peppers, and onions can make a colorful and delicious sugar and vinegar roasted gluten stew.

In addition to sugar and vinegar roasted gluten, roasted gluten can be used to make roasted gluten rolls, roasted gluten cakes, roasted gluten skewers, and more. Moreover, roasted gluten can also be used to replace meat and make vegetarian versions of dishes such as stir-fried shredded meat and fried chicken nuggets.
Thanks to those who discovered roasted gluten, we can better understand the diversity of vegetarian cuisine.

【Washing Method】
- All Purpose Flour 250 g
- Instant Yeast 1 tsp
- Sugar 1/2 tsp
- 37C Lukewarm Water 1 tbsp
【Non Washing Method】
◤Ingredients
- Vital Wheat Gluten 200 g
- All Purpose Flour 16 g
◤Yeast Liquid
- Instant Yeast 1 & 1/2 tsp
- Granulated Sugar 1/2 tsp
- Nutritional Yeast 1/4 cup
- Water 250 ml
◤Sweet and Sour Gluten
- Roasted Wheat Gluten or Wheat Gluten 200 g
- Sweet Bell Pepper
- Pineapple
◤Sweet and Sour Sauce
- Homemade Tomato Paste 2 tbsp
- Demerara Raw Cane Sugar 1 tbsp
- Montfruit Sweetener 2 tbsp
- Organic Apple Cider 3 tbsp
- Homemade Soy Sauce 2 tbsp
- Worcestershire Sauce 1/4 tsp
- Water 5 tbsp
◤Starch Liquid
- Corn Starch 1 tsp
- Water 1 tbsp

◤Shop Here
Vital Wheat Gluten https://iherb.co/s3rRgmFh
Nutritional Yeast https://iherb.co/YACtMSY
Use promo code PAN8577 to enjoy discounts on iHerb https://iherb.co/7Yjri1h
◤Instruction for Washed Gluten and Air-Fried Gluten
1. Separate the starch and protein of the dough by washing the gluten. In a large bowl, mix together all-purpose flour and salt, then pour in hot water while stirring. Different brands of flour have different water absorption rates, so don’t pour in all the water at once. Reserve about 1/10 of the water and wait for the flour to absorb it before adding more.
2. Knead the dough until it becomes rough and then cover it and let it rest for 45 minutes to prevent the surface from drying out.
3. When flour is mixed with water, the starch dissolves but the protein does not. As the dough is kneaded, the ingredients inside the dough start to repel each other. Given enough time, gluten networks will form. After resting, knead the dough again to strengthen the gluten.
4. Roll the dough into a ball, place it in a large dish, and cover it before letting it rest for 15 minutes. The gluten will have better elasticity after this relaxation period. You should be able to stretch it into a thin film, which will make the gluten more delicious.
5. Put the dough in water and press and wash it. The water will gradually become cloudy, and you should squeeze it with your hands. Keep squeezing until the water becomes a milky white color, and the gluten is fully covered in water.
6. Collect the starchy water and use it to make cold skin. Refer to a video tutorial to learn how to make cold skin.
7. The gluten, which is mainly composed of protein, will naturally stick together. Tear the gluten and squeeze it into small balls, pull the opening downward and tighten it, then put it into the air fryer and lightly spray it with oil.
8. Press the button to start the air fryer. The gluten will expand during the frying process, so make sure to maintain a proper distance between the pieces. Bake at 200°C for a total of 10 minutes, flipping once or twice during the process.
9. The first batch of fried gluten may deflate, but don’t worry. After 5 more minutes of air frying, it will puff back up again. Flip it over to ensure even frying.
10. As the frying continues, the gluten will become increasingly light and spin in the air fryer’s airflow. In the final two minutes, the oil gluten will turn golden and become crispy. The healthy version of the oil gluten is now ready. It can be stored at room temperature and will be crispy and delicious.
◤Instruction for Unwashed Gluten and Air-Fried Gluten
1. Mix instant yeast with 37°C warm water and stir until the yeast is completely dissolved. Let it sit for 10 minutes.
2. The yeast mixture will expand in volume and be filled with bubbles.
3. Mix the gluten flour with nutritional yeast and all-purpose flour. Gluten flour has strong water absorption and elasticity, so I added some all-purpose flour to moderate it.
4. Mix the dry ingredients with the yeast mixture and slowly add warm water. Since gluten flour has a high viscosity and absorbs water quickly, stirring will become difficult. Pay attention to the dough’s moisture level and let it absorb the water for a while. If you find that too much water has been added, you can pour off the excess. Knead the dough until it is not sticky, cover it, and let it rise.
5. At room temperature of 25°C, it will take about 30 minutes for the dough to rise. When there are many air holes on the surface and it is soft and elastic when pressed, knead it a few times and roll it into a ball.
6. I divided the dough into two parts, one for air frying and the other for steaming. I put them in different containers, covered them with a damp cloth, and let them rise in a 35°C environment until their volume tripled, which took about 2 hours. I cut them with scissors, squeezed out small balls, and pulled the edges tightly downwards. Cover them with a damp cloth and let them sit for 20 minutes until they double in size.
7. Spray some oil on the air fryer and put the gluten in it. Bake it at 200°C for 10 minutes.
8. Flip it over after 5 minutes. The dough made with gluten flour is harder, so it won’t collapse when flipped over. Bake for another 5 minutes until golden and puffy with a crispy outer layer.
9. Place it on a kitchen paper towel to absorb excess oil. Carefully tear it open to see the texture inside because it will be hot.
10. Steam the other half of the gluten for 20 minutes.
11. After shaping and removing it from the mold, the air holes produced by fermentation are like a mesh sponge, like cutting bread.
◤Instrutction for Sweet and Sour Grilled Gluten
1. First, prepare the starch water and sauce. Mix homemade tomato sauce, raw cane sugar, monk fruit sugar, organic apple cider vinegar, soy sauce, Worcestershire sauce, and water together and stir well. Set aside.
2. In another bowl, dissolve cornstarch in water and stir until the starch is dissolved.
3. Remove the stems from the tri-color bell peppers and cut them into pieces. Cut the pineapple into chunks.
4. Add a little oil to the pan, stir-fry the bell peppers, add the pineapple, and remove the vegetables.
5. Heat the sweet and sour sauce until it boils, add the starch water and stir well. Add the grilled gluten, which is clean and not greasy because it was homemade, so there’s no need to blanch it. You can directly simmer it in the sweet and sour sauce. Add a little more water to prevent it from drying out while simmering. The simmering time for gluten made from gluten flour should be longer, about 10 minutes, while the simmering time for washed gluten should be 5 minutes.
6. Plate the grilled gluten, soaked in the sweet and sour sauce. It has a chewy texture and a beautiful color.
